Drag to rotate, scroll to zoom
Kit card ยท 4 colors ยท snap fit

Dungeon Crawler Carl Snap Kit

One pocket-sized kit card, five parts, zero glue. Snip the pieces off the frame, drop the dungeon floor on your desk and snap in the burst backdrop, the title plate, Carl and Princess Donut. Fits every Bambu bed, A1 mini included, and prints in one go with no supports.

96 x 129 mm card5 snap partsFits A1 mini4 colors or 1No supportsNo glueFan art

What is in the kit

Everything prints flat on one plate, laid out like a model kit sprue.

๐Ÿงฑ

Dungeon floor

An 88 x 27.5 mm tiled stone base, 4 mm thick, with a through slot for every tab. It hangs off the bottom of the card on four small sprues.

๐Ÿ’ฅ

Burst backdrop and title

A red and yellow explosion burst stands at the back. A black title plate with inlaid DUNGEON CRAWLER CARL lettering, and a round red eye in the A, stands on two legs at the front left.

๐Ÿˆ

Carl and Donut

Two black silhouettes, Carl mid-kick and Princess Donut beside him. Every part stands on the same 4 x 2 mm tab, so all six tabs fit the same slots.
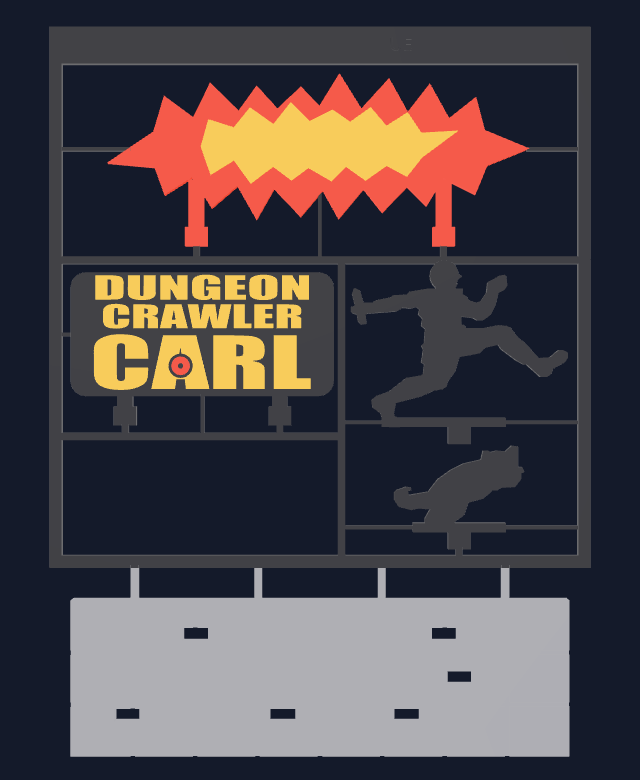
The Dungeon Crawler Carl snap kit card seen from above, ready to print

Print it

Settings

PLA or PETG, 0.16 or 0.20 mm layers, 15% infill, no supports. Print the card flat exactly as it loads. The card is 96 x 129 mm and about 22 g of filament, so it fits every Bambu printer, A1 mini included, with room to spare.

Four colors

Load the four color files together as one object without auto-arranging: black (frame, title plate, Carl, Donut), yellow (lettering and fire), red (burst) and stone gray (dungeon floor). They share coordinates and line up on their own.

One color

No AMS? Print the single MakerWorld file. The lettering and the eye are raised 0.8 mm so they still read in one color. Paint the burst and floor afterward if you like.

Instructions

Build it

About five minutes with a pair of flush cutters. Press "Watch it build" on the viewer to see each step.

  1. Snip the parts off the card. Use flush cutters on each thin gate, cutting close to the part. Each tab has its own small gate at the tip. Clean any nub with a hobby knife or a file so the tabs slide in straight.
  2. Break off the dungeon floor. Snip the four small sprues that hold the floor to the bottom of the card. Set the floor tile side up on your desk. The frame is done; recycle it.
  3. Snap in the backdrop. Stand the burst upright, fire facing you, and push its two tabs into the two slots along the back of the floor.
  4. Add the title plate. Push the two legs of the DUNGEON CRAWLER CARL plate into the front left slots, lettering facing forward.
  5. Place Carl. Press his tab into the slot on the right side of the floor.
  6. Place Princess Donut. Press her tab into the front slot beside Carl. Done: loot box earned.
Fit check: every tab is 4.0 x 2.0 mm and every slot is 4.5 x 2.5 mm, so there is 0.25 mm of play per side, the kit card standard. Too tight (usually first layer squish): scrape the bottom edge of the tab. Too loose: a dot of glue, or reprint the floor at 0.16 mm layers.

Specs

Kit card96 x 129 mm, printed flat in one job, about 22 g
Built diorama88 x 27.5 mm floor, about 34 mm tall
PartsDungeon floor, burst backdrop, title plate, Carl, Princess Donut
ColorsBlack, yellow, red (burst and eye) and stone gray, or any single color
Parts2 mm thick, floor 4 mm
Joints4.0 x 2.0 mm tabs in 4.5 x 2.5 mm through slots, 0.25 mm clearance per side
HardwareNone. No glue, no magnets, no print pauses
Files, print profiles and photos are on MakerWorld.

Open on MakerWorld All models

Fan art made with permission granted by Matt Dinniman to small shops. Dungeon Crawler Carl is created by Matt Dinniman. Denver Board Gamers is not affiliated with the author or publisher.

More from Denver Board Gamers

Built for the table, printed in Colorado

Free tools we built because we could not stop tinkering, plus handmade gear from the workshop.